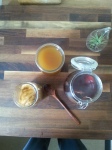
So, I have had quite a few friends ask about making Kombucha at home. Even though there are plenty of blog posts already out there about this, I figured I would share my experience. I started looking into ordering a … Continue reading
So, I have had quite a few friends ask about making Kombucha at home. Even though there are plenty of blog posts already out there about this, I figured I would share my experience. I started looking into ordering a … Continue reading
This gallery contains 17 photos.
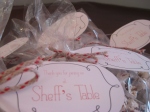
This post is a little venture off from those in the past, yet remains within the philosophy of the blog, “make love with your hands.” For many years Adam has had the idea of running a ‘chef’s table’ in our … Continue reading
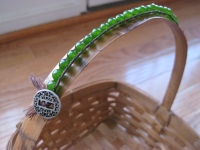
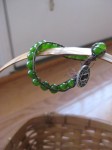
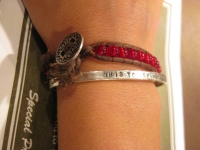
I decided to practice making another Boho bracelet and made one for a good friend of mine who I think will love it as much as I do. Here’s some quick pics:

So about a week and a half down, 3 crafts completed. Hopefully I can keep the naptime crafting going!
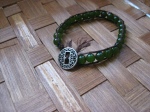
So I wanted to keep up with my crafting and accomplish another project while dealing with the craziness that has been my life for the last week or so. All good craziness; graduation, birthdays, family in town, etc. I’ve been meaning to make some of these “boho” beaded bracelets for awhile and thought now would be the perfect time. I knew I had some beads lying around that I could use, and I think for my first bracelet it came out halfway decent:)
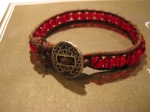

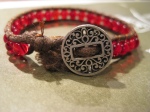
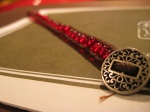
I watched a couple minutes of this video to get an idea of how to start and such, but really just took it from there. Not bad. I’d change a couple things next time around, but it only took me about an hour from start to finish, and I’m sure it goes faster as you get more comfortable with the motions and steps. Hope you like it!
I will start out here by apologizing. It has been a good 10 months since I last posted and for that I am sorry. Sorry to my readers, but also sorry to myself; with the lack of postings you can imagine the lack of crafting that has been taking place. I have been quite busy (and I’m sure I’ll continue to stay busy) but I have finished my Graduate work and will now be staying home. This will hopefully allow for some “naptime crafts”. My goal is to complete a minimum of one project a week. Now I don’t know if this is feasible, but I’d really like to try. I have approximately 12 weeks until another little one arrives to join our family, and I figure I can squeeze some stuff in before then.
During my first couple days out of school I wanted to attempt something fairly simple. I have been wanting a coffee mug cozy for some time now. What’s interesting is that when Mr. asked me what it was for I couldn’t really describe why one would use it on their mug, but that’s besides the point. What is the point? To keep your hands away from the too hot/too cold cup o’joe you just made/ordered for yourself. And of course, it is “in” thing right now and super cute!
I started out on my Pinterest page looking for different ideas I might like. There were so many that came close, but none fit the bill of exactly what I was looking for. So I came up with my own, based on this design.
Here’s mine:
I think it looks like a little sweater, don’t you? The color doesn’t come through great but is a very soft almost-mustard yellow.
The reason I picked this pattern is because I liked the stitches, kinda like little “v’s” all over. Here’s a couple up close.


Then today I made an iced coffee to go and tried it out on there. It kept my hands dry even though my coffee was sweating from the cold/heat. It’s not the best photo but…

Here’s what I did…
Materials:
Worsted weight 4 medium yarn
Size H Hook
3 small/medium buttons
Thread
Tapestry needle
st= stitch
sc=single crotchet
lsc=long single crotchet
dc=double crotchet
sl=slip stitch
ch=chain
Pattern:
Chain approx 30 sts. (If you have a cup you may use for a size tester, now would be good to make sure it fits around, with a slight overlap)
Row 1: sc in each st, ch 1, turn.
Row 2: lsc in each st, ch 1, turn.
Row 3: *dc in each st, ch 1, turn.
Row 4: lsc in each dc, ch 1, turn.
Row 5: sc in each st, ch 1, turn.*
Repeat from * 3 times, or until desired height has been reached.
Finish off by sl st around entire piece. At one end, use 2 ch sts for each button hole.
Sew buttons on other side of piece, placing where they will fit in holes.
That’s it! You can play with the buttons, using more, less, or making them permanent parts of a slip in cozy for your to-go cup.
Hope you enjoy!

So I’m totally hooked on the stenciling thing. I’m wondering when Adam is going to tell me to stop. I realized recently that our living room is basically the only room that reflects nothing about us. No style, no fun, nothing. So I decided to stencil one wall, leaving it as an accent for the rest of the room.
I painted it Granite Grey by Glidden, and then stenciled Sunbeam (and had the guy make it 25% lighter) on top. I fell in love with the stencil on lightsforever’s etsy.com site, probably because it was pictured in the colors I was planning. It was pretty inexpensive, and I used a spray stencil adhesive to keep it on the wall. Since it didn’t have the corner markers, I put holes in each corner and marked it as I went along. It was definitely off a little, but I have a feeling Martha Stewart isn’t coming to my house to measure things anytime soon…
It took awhile, but it was well worth it. It does something to the room, makes it completely different. I also spray painted our simple black clock a teal color to be a little more fun as well. Now just a bunch of additional things (framed various mediums of art is my next project) and this room will be as great as the rest of the house;)


For our May meeting of Crafty Chicks, I led the group in creating French memo boards. I’ve done it once before, completely trial and error, but this time I looked up some directions and we tried to follow those. It’s a pretty basic concept.
1. Cut foam board to desired dimensions.
2. Cut batting 1″ larger than board on all sides. Cut fabric 1″ larger than batting.
3. Hot glue to board.

4. Place ribbon where you want it and hot glue to back.
5. Place tacks at ribbon crossing and glue in back to keep in place.


6. Glue on picture hook.

7. Hang on wall.

I would remember to iron the fabric before putting it on and keep everything fairly tight when you are gluing it down. I also used very thin ribbon because I didn’t want to cover the pattern on the fabric (and that’s all I had in the house:)).
I decided to use my button cover maker to cover the thumbtacks with the same fabric, as to not draw and extra attention to them, but you could totally use some really elaborate tacks and make them the standout part of the board.
 I read a recipe awhile back for a simple vegetable wash concentrate. With all of the crazy things that come on our fruits and veggies these days I figured I’d give it a try.

Recipe:
Put the zest of 2 lemons in 1 Cups of vodka (I did a double recipe). Let sit for two weeks. Strain. Use 1-2 Tbs per gallon of water. Use as spray or soak.


I decided to put it in a squeeze bottle for easier use and storage. I had a little extra…thinking it might be good in a cocktail;)
It was super easy and now I’ll feel slightly better to sanitize our produce before it gets to my little girl’s mouth. That is if she doesn’t eat it during the car ride home.
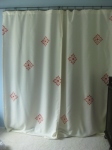
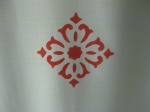
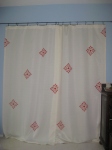
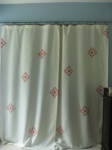
We’ve had these cream colored curtains in our bedroom for a little while now. Two of them are the doors to our large closet opposite our bed, and one covers a window. I got them at Target at a great price, but that great price came with the fact that they were really uninteresting. I recently bought a box of tissues that was this fun red-orange color that really popped against the light blue walls. So I decided upon this color for the funky aspect of our bedroom. I think it came out pretty classy too.
I have to tell you, I’m now hooked on stenciling. With so many projects on my list the next project involving stencils may be a little while off.
Here are some photos. Hope you enjoy!


So I know I have been missing for awhile, basically the entire semester, but I have about two weeks off and plan on completing some great projects. First here I will show you a little something I did for Easter. I think it would be a great party favor if you have people over for a party, and it could even be just a spring party. Or even Passover:)

I poked some holes in the eggs and “blew them out”. Basically I stuck a pin in each end, poked around a bit inside to get it moving, and blew in one of the holes. (the one that I was blowing in was a bit smaller than the other end.) It takes a little time, some more mixing, but it all comes out. Then I ran it under water to get some inside and blew that out. Much cleaner that way.
Now I did this the night before Easter brunch, so I didn’t have time to follow this, but if you can leave the eggs upright overnight over a papertowel to absorb anything left inside it would be a smart decision. Mine ended up leaking a bit and messing with the dye.
I did end up dying my eggs different colors because it was Easter, but I could totally see doing this with brown eggs and leaving them, or white eggs and using a light colored pastel blue to look natural.


Then I printed out some fortunes I found online, but you could write some of your own. I rolled them up really tightly and pushed them into the small hole at the end.


Display and let your guests think they are fake eggs. When you tell them about your surprise and let them each pick one out, I hope they are delighted as my guests were.
I borrowed this idea from poppytalk, Easter egg fortunes. Check them out for other cute ideas.


